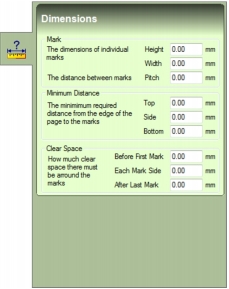
Dimension Settings OMR mark dimension settings appear on the Mark Dimensions sub-tab (Fig. 39) on the OMR Marks tab (Fig. 30). Fig. 39 Mark Dimensions sub-tab To open the Mark Dimensions sub-tab, perform the following actions: 1. Select, add, copy or import an OMR configuration. 2. Click the Mark Dimensions button (Fig. 40). Fig. 40 Mark Dimensions button The following dimension settings are provided: Setting Description Mark Determines the height, width and pitch in millimetres (mm) of OMR marks. The pitch indicates the distance between the top of an OMR mark and the top of the next, or the bottom of an OMR mark and the bottom of the next. Minimum Distance Determines the minimum distance in millimetres (mm) from the top, bottom and side of a page where the clear (white) space* can appear Clear Space Determines how much clear (white) space* in millimetres (mm) there is around OMR marks. *CAUTION The clear (white) space is the area where OMR marks appear. It overwrites page content to prevent it from obscuring OMR marks. It is therefore paramount that important information on your mail pieces does not appear in this area.