Managing OMR Configurations : Position Settings

Position Settings
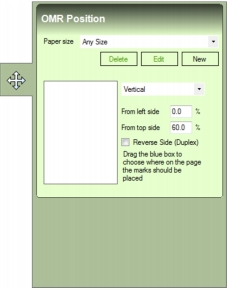
OMR mark position settings appear on the Position sub-tab (Fig. 41) on the OMR Marks tab (Fig. 30).
Fig. 41 Position sub-tab
To open the Position sub-tab, perform the following actions:
1.
Select, add, copy or import an OMR configuration.
2.
Fig. 42 Position button
The following position settings are provided:
*NOTE:
If the Any Size option in the Paper Size list box is selected, the From Left Side and From Top Side dimensions are a percentage. For all other options the dimensions are in millimetres (mm).
Manually Positioning OMR Marks
The From Left Side and From Top Side position settings allow you to specify the position of OMR marks by a percentage or by millimetres (mm). However, if preferred you can manually define the position by performing the following actions:
1.
2.
3.
4.
5.
6.
The From Left Side and From Right Side values now change to represent the position of the blue box.
Managing Paper Size
Paper sizes appear in the Paper Size list box on the Position sub-tab (Fig. 41) and can be added, edited and deleted as required.
Paper size is specified in a Paper Size Settings dialog (Fig. 43) that appears after clicking the New or Edit button in the Position sub-tab.
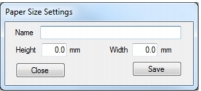
Fig. 43 Paper Size Settings dialog
Adding
To add a new paper size, perform the following actions:
1.
Open the Position sub-tab (Fig. 41).
2.
3.
In the Paper Size Settings dialog (Fig. 43) click inside the name edit box then specify a name for the paper size.
4.
5.
6.
A Save Changes dialog (Fig. 16) now appears asking you to confirm the save.
After a paper size has been added, the name specified for the paper size appears as an option in the Paper Size list box.
Editing
To edit an existing paper size, perform the following actions:
1.
Open the Position sub-tab (Fig. 41).
2.
3.
4.
5.
In the Paper Size Settings dialog (Fig. 43) click inside the Name, Height and Width edit boxes then make the required change(s) to each one.
6.
A Save Changes dialog (Fig. 16) now appears asking you to confirm the save.
NOTE:
The Any Size paper size option cannot be edited.
Deleting
To delete an existing paper size, perform the following actions:
1.
Open the Position sub-tab (Fig. 41).
2.
3.
4.
A Confirm Action dialog (Fig. 17) now appears asking you to confirm the delete.

CAUTION:
Deleting a paper size will remove it from OMR configurations that have it specified. This may cause these OMR configurations to work incorrectly.
NOTE:
The Any Size paper size option cannot be deleted.