Getting Started : The Client

The Client
The Client is a Windows application that provides an interface (Fig. 6) for performing the following operations:
System Requirements
The Client has the following system requirements:
*MORE:
For details about installing Windows components, refer to your Windows documentation or help.
Installing
The Client is installed independently from the Service on the same or different PC/server.
NOTE:
It is advised you install the Service first then the Client.
The Client installation program (SilentPrint3_Universal_Client_Setup.exe) is available for download from the following location:
funasset.com/softwaredownloads
NOTE:
If a previous installation of the client is already running, exit it before installing a new one.
Double-click the Client installation program to begin the installation process. Following this, the SilentPrint3 Client Setup Wizard (Fig. 2) opens which guides you through the installation process.
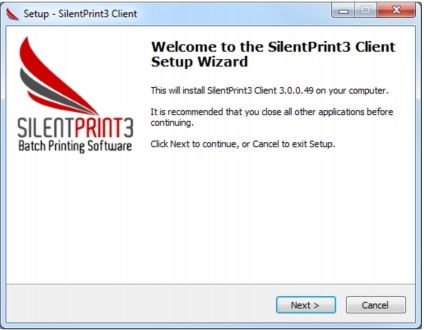
Fig. 2 SilentPrint3 Client Setup Wizard
Installation can be aborted at any time by clicking the Cancel button.
Third-party Software
The Client has the following third-party software automatically installed with it:
 
Launching (Running)
By default, the Client is automatically launched on Windows logon.
To launch the Client manually, use the SilentPrint3 Client option found in one of the following locations, or search for SilentPrint3 Client in Windows Search or Cortana:
Following launch, the SilentPrint3 icon (Fig. 3) appears in the Windows Taskbar Tray.
Fig. 3 SilentPrint3 icon
Windows Logon
To enable or disable launching the Client on Windows logon, perform the following actions:
1.
Open the interface (Fig. 6).
2.
3.
Icon States
While the Client is running, the colour of the SilentPrint3 icon (Fig. 3) in the Windows Taskbar Tray changes to signify different SilentPrint3 operational states:
Accessing Features
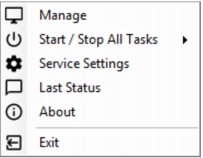
Many SilentPrint3 features are accessible from the Tray Menu (Fig. 4).
Fig. 4 Tray Menu
To access the Tray Menu, perform the following actions:
1.
Launch the Client.
2.
Right-click the SilentPrint3 icon (Fig. 3) in the Windows Taskbar Tray.
Following this, the Tray Menu appears alongside the SilentPrint3 icon.
The Tray Menu contains the following options:
Opens the interface (Fig. 6).
Exits the Client.
 
Click an option to access the associated feature.
Tray Status
A tray status (Fig. 5) appears near the Windows Task Bar Tray to provide notification about the following:
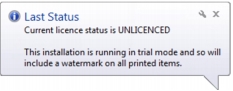
Fig. 5 Tray status
To view the last status, click the Last Status option in the Tray Menu (Fig. 4).
Interface Overview
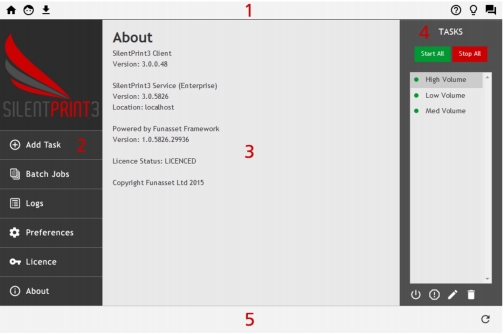
The Client has an interface (Fig. 6) that consists of the following components:
 
Fig. 6 Client interface
Opening
To open the interface (Fig. 6), click the Manage option on the Tray Menu (Fig. 4).
Closing
To close the interface (Fig. 6) click the Close button (X) located top right of the interface window.
Refreshing
To ensure information on an interface (Fig. 6) page is up-to-date, click the Refresh button (Fig. 7) located on the Status Bar.
Fig. 7 Refresh button
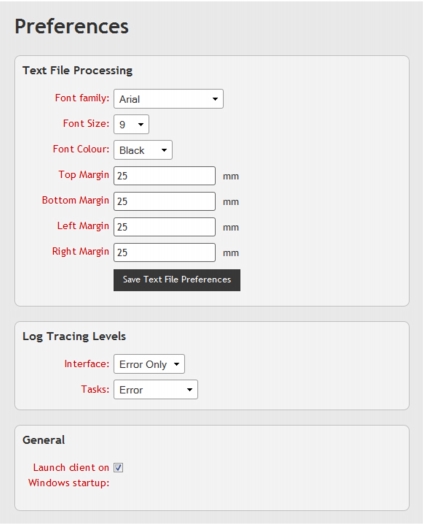
Specifying Preferences
To view and configure SilentPrint3 preferences, perform the following actions:
1.
Open the interface (Fig. 6).
2.
Fig. 8 Preferences page
MORE:
For details about specifying Text File Processing preferences, refer to Tasks > Text File Processing.
MORE:
For details about specifying Log Tracing Levels, refer to Log Files > Configuring Tracing Levels.
Exiting
To exit the Client (so it is no longer running), click the Exit option on the Tray Menu (Fig. 4).
Uninstalling
To uninstall the Client, search for Uninstall SilentPrint3 Client in Windows Search or Cortana, or perform one of the following actions:
An Uninstall SilentPrint3 Client wizard guides you through the uninstall process.